Get to Know Your Shoulder Joint

1.png

Part of the study of yoga is getting to know our bodies better. With all our focus on the shoulders lately in my classes, I thought it might be helpful for you to get to know your shoulder joint a bit more from an anatomical standpoint. If your eyes glaze over when anyone says anatomy I understand! That was me for a very long time. But when you see how the knowledge of anatomy can inform healthy movement patterns and inform the choices you make in your practice, it all becomes a little more palatable. I'm going to give you a very basic overview here which I hope will enable to you to make good choices for your own body as you move through your life and practice.

What is a joint in the human body?

First - a basic definition. A joint is where two or more bones come together in the human body. You probably already knew that. We typically think about the knees, hips and shoulders when we think of joints but did you know there are also joints in your spine, your fingers and toes and other places? This simple definition helps us be clear as we move forward.

Bones of the Shoulder

bones of the shoulder.png

There are three important bones that create your shoulder joint as you can see labeled above. I’ve given you both the common and the technical name for each of these. I highly recommend that you palpate your own body with your hands as you look at the image to really find these things in your own body. If you have a willing and consenting other human nearby that can be helpful too! The combination of read information and sensory input will help you learn.

The first and probably most obvious is your Humorous or upper arm bone. It’s probably the bone that we think about the most when we think about the shoulder. It may even be the ONLY bone we think about when thinking of the shoulder. But there are two more important players.

The second is the Clavicle or collar bone. It’s that bone on the front side of the body that extends from the front of your neck (just slightly offset to the right or left) out to your shoulder. You’ll find it at the top of your rib cage and it forms the part of the top edge of what we often think of as our shoulder. If I asked you to take your left hand and put it on your right shoulder the heel of your hand would likely be resting on this bone.

While you’ve got your hand on your shoulder [you did do that didn’t you?! ;-)], your fingers are probably curling over the back of your shoulder and that’s where you’ll find the third bone, your shoulder blade or Scapula. You may never have thought of this before, but your shoulder blade is called your shoulder blade because it’s an essential part of your shoulder joint! And what you’re likely feeling under your fingers is what’s often referred to as the “spine” of the shoulderblade. The tip of that spine (closer to the outside of your body) is called the Acromium.

So where’s the actual shoulder joint?

shoulder joint.png

The actual shoulder joint (or glenohumeral joint if you want to get technical) is where the humorous and the scapula fit together. There’s a shallow cup on the shoulder blade where the upper arm bone fits in. They are connected together first by connective tissue (labrum, cartilage, ligaments, etc.) and then by a series of complex muscles known as the rotator cuff. So unless you have an injury or something else going on, the big thing to know here is that your upper arm bone (humorous) is attached to your shoulder blade (scapula). While the collarbone is not directly connected here it does play an important role in movement, but that’s a bit beyond the scope of the current exploration.

Why should you care?

movement of the scapula and humorous.png

Any time you move your upper arm bone your shoulder blade MUST move. This becomes really important when you set up for postures like bridge or wheel because how you position that upper arm bone will influence the movement of the scapula and therefore the whole shoulder joint. Any time you take the arms overhead like in Warrior 1 or Down dog, the shoulder blades must also move upward (that’s an over simplification but for the purposes of this discussion it’s sufficient). Not allowing the shoulder blades to move properly may cause trouble over time for the healthy functioning of the shoulder joint.

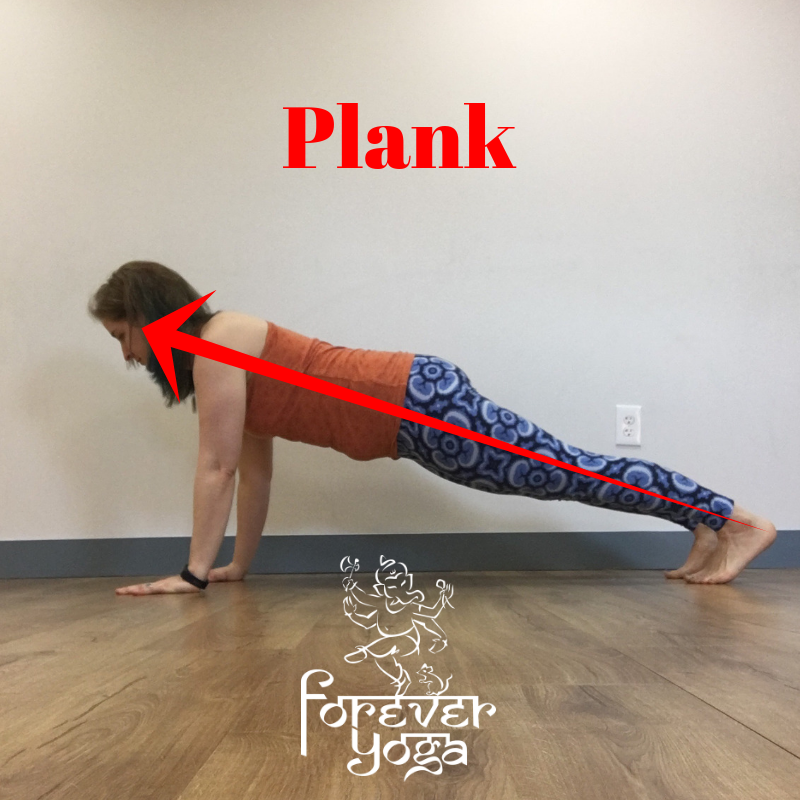
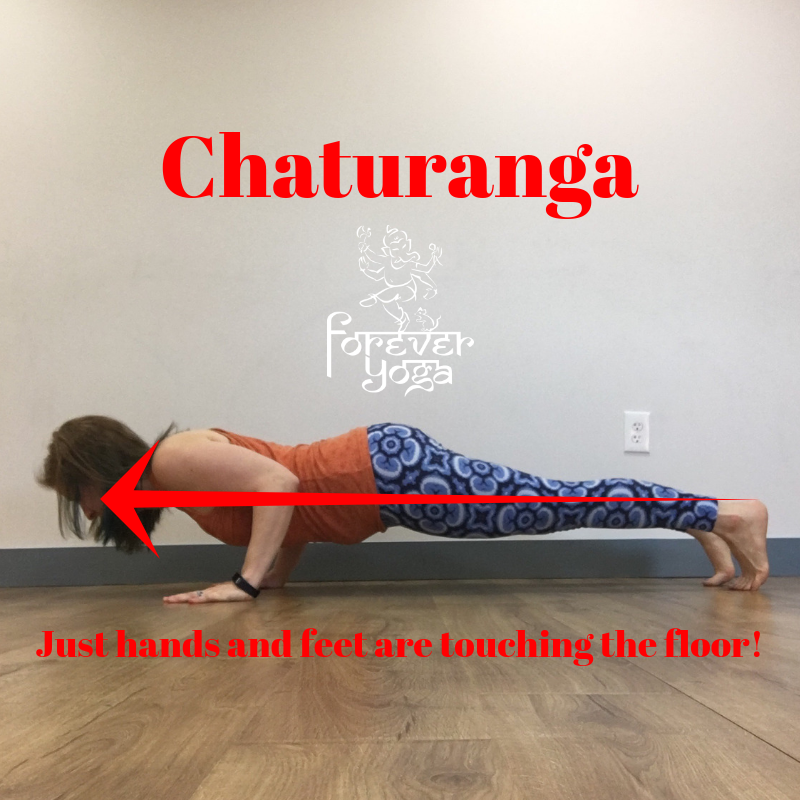
Knowing how these two bones are connected also gives us a better understanding of what “stability” in the shoulder joint really means. There are three very stable positions for the shoulder joint: 0 degrees of flexion (when the arms are resting alongside your torso in a standing position), 90 degrees of flexion (plank pose) or 180 degrees of flexion (arms directly overhead like in handstand). This is helpful if you DO have an injury or strain in this area because you can pay attention to how your bones are aligning to create stable positions and avoid unstable ones. You can also offload weight from the shoulders if they are moving between any of these angles if you do have an injury or you know that you still need to build strength in this area (chaturanga anyone?!).

Questions? Leave me a comment below!

If you want to get to know your shoulders more through movement, sign up for one of my livestream classes this month or join me on Patreon to practice on demand!


If You Enjoyed This Post You May Also Like…

Shoulder shredder no more!!

Shoulder ShredderNo More!.png

There's this old joke in the yoga world that Chaturanga is Sanskrit for shoulder shredder. Yikes! As is true with many things like that, the joke probably sprang from some bit of truth. In so many vinyasa yoga classes this is a posture that is often rushed through, misunderstood and therefore misaligned, and doesn't often get much slow precise attention because of being rushed and misunderstood. I know that certainly was the case for me for a long time.

Today I'd like to bring a bit of clarity to the basics of this pose so whether you can do it or not, you have a better understanding of what it is and how to work towards gaining enough strength to do it well.

First off, the actual translation of the Sanskrit name Chaturanga is Four Limbed Staff pose. This already tells us a great deal about the actual posture! Our four limbs are involved, and it's a pose that emulates a staff. When you think of a staff, it might draw to mind something like this:

This was as close to Gandalf as I could get without copyright infringement! ;-)

This was as close to Gandalf as I could get without copyright infringement! ;-)

Ignoring any magical connotations (although it can be pretty magical when you can finally do Chaturanga well!) notice that the staff pictured here is long, straight and strong looking. If we leave out our arms for a moment, we can translate that into the pose and our body by thinking of it as long and straight like a staff. Remind you of anything?

Plank.png

Yep. Plank pose. Plank pose is mostly commonly the pose we're in before we attempt Chaturanga. Our plank pose needs to be strong and well aligned first. Notice in the picture above that there is a very distinctive straight line from the heels right up through the crown of the head.

Sometimes we refer to plank as a high pushup and Chaturanga as a low pushup. But here's the catch - your belly/hips should not touch the floor in Chaturanga. By all appearances, to move from plank to Chaturanga you simply bend your arms and lower part way to the floor. (That isn't actually true by the way. The transition between plank and Chaturanga is another topic which I'm happy to write about if there's interest. Let me know in the comments!) The four limbs (or really your hands and the balls of your feet) should be the only things touching the floor.

And if you're really lucky, your photographer is quick with the shutter!

And if you're really lucky, your photographer is quick with the shutter!

Easier said than done! If you've ever tried it you probably know that stopping before you hit the ground is incredibly difficult. At least until you've gained the strength needed to do so. It's also really important for the shoulders that they don't fall below the elbows. You can see that pretty clearly in the image above. The muscles of the shoulder girdle need to be strong enough to keep the shoulder joint stable while it holds the weight of the body off the floor. That's probably how that old joke got started. So how can we build the strength we need to do this posture well?

You may have noticed in my classes this past couple of weeks we've been working quite a bit with back body strengthening postures. The muscles of the back of the body are often overstretched and weak due to our modern lifestyle (raise your hand if your slumping over a computer keyboard or hand held device right now! Made you straighten up, didn't I?! ;-)). Some of these postures other than plank, as mentioned above, include:

- Locust pose: With the belly down on the mat the back body muscles MUST fire in order to lift the limbs. We've also been including some breast strokes to increase the challenge of this back body strengthening posture.

- Mini push ups with the knees down: Without the strength to do the posture well, the shoulders can be put under undue strain and stress. Here we take the weight of the body out of the equation to focus on alignment of the shoulders and arms and to build upper body strength to sustain the pose.

- Forearm plank: To me, this pose can feel like an all-over workout! Your core is supporting the spine, the legs are strongly helping to activate the core and the shoulder girdle and upper body are sustaining the weight of your body. This is also nice if you have any pain in your wrists; you can take them right out of service and still gain strength. 

If you find you struggle with poor posture throughout the day, strengthening the core and the back body line will allow your posture to improve as well. 

There are many other aspects of this posture that are important to understand but beyond the scope of this blog post. If you'd like even more clarity around this pose, be sure to sign up or join the waiting list for my Yoga Fundamentals: Shoulders & Chaturanga workshop coming up this month or schedule a private lesson with me for even more individual attention! If you have specific questions, I'd love to hear them! Leave a comment below.

I wish you strong stable shoulders!

Ardha Uttanasana or What’s the deal with half way lift?

Ardha Uttanasana.png

It’s a posture we seem to do a lot in vinyasa yoga classes but breeze right by without a second thought. So what’s the deal with Ardha Uttanasana?

First, let’s break down the Sanskrit. You may be very familiar with Uttanasana 

FullSizeRender-3.jpg

Often teachers don’t use the Sanskrit name of this pose. Ardha means half and uttansana is forward fold. So we get half forward fold.

Which is probably why you’ve heard this cued as “lift halfway” or “halfway lift” from forward fold. That’s all well and good if you’re, as my husband calls me, bendy. But what if you aren’t so bendy? What if your Uttanasana looks like this:

FullSizeRender-4.jpg

Well, first of all, you’re just fine where you are! Don’t try to force yourself into a deeper forward fold. We always want to honor our bodies as they are and know that change is always possible. There are things we can do to make your forward fold better, but that isn’t what this post is about. So, getting back to our focus pose, if someone tells you to “lift halfway” and you’re already about half way between the possibility of folding and standing, what’s a yogi to do?

Consider what Ardha Uttansana is asking us to do. As far as shape goes, we’re basically making an upside down L with our bodies. That means that we want to lengthen our spine and strengthen our legs and our core support. So go back to that first picture of the posture.

FullSizeRender-1.jpg

Some things to notice.

As always, we want to build the posture from the ground up, so feet are sit bones distance apart and pressing into the earth with arches engaged. Moving up from there, and this is the first important point, knees are not locked. Often when we lift the spine up into this pose we tend to throw the knee joints back and inadvertently lock them out. That doesn’t help us build core strength because it stops that flow of energy from the earth we’ve cultivated by lifting the arches. Instead of the muscles doing their work, we throw all the effort of pose into the joints. Total bummer and not what joints were meant to do. So if we keep the knees slightly bent we have more opportunity to strengthen.

Next consider, where does that lift of the spine actually come from? Certainly, the muscles that run along the back part of the body are going to have to work here. That just makes sense. But wouldn’t it be nice if they didn’t have to do everything to fight gravity and achieve “lift off” on their own? Especially if you already have tight hamstrings or tend to experience low back pain? Of course! So that’s why we want to engage the core, as well as the belly/abs. I often think of this movement like a rising wave. When I’m lifting my spine up into the pose I actually think of lifting my belly first and then let that energy travel up the whole length of my spine. It’s like the spine unfurls in a wave that rolls out through the crown of my head. With that inner body support, my low back is fine and my spine can grow long.

Here’s where we have to show control though. Consider the difference between the picture above and this one:

FullSizeRender-2.jpg

Does this look like my neck is happy? Notsomuch. So we contain that wave of energy we’ve brought up from the earth through the legs and into the spine just enough that it draws the head into line with the rest of the spine. With all of that inner body activation the back body (which is a group of much smaller muscles) doesn’t have to work as hard. But let’s go back to that back body for one more moment to check in on one very important spot. The shoulders.

FullSizeRender-1.jpg

We’ve been working with engaging and strengthening the shoulders a lot in my classes lately. Here is no exception. Instead of slumping

FullSizeRender-4.jpg

The shoulders draw up and on to the back. That stabilization helps those small back body muscles get the memo that they do have to do some work too. It also allows the heart to open a bit more which helps with one most excellent thing: getting a deeper breath! If you think about it you are most likely asked to inhale when coming into this posture. The shoulders engaged allow us the space to get that nice deep breath we need for whatever might be coming up next. Yay!

So going back a bit, if you’re that person that can’t really touch your toes, what can you do in this pose and how can it benefit you?

First, you can think about that spinal length we’re looking to achieve here. With that lengthening of the spine you are finding the space for a fuller, deeper breath. With that deeper breath IN is the possibility for a fuller breath OUT which may encourage your back body to release a little more into that full forward fold on the next repetition.

Second, When you’re in this posture you can think more about pressing into the feet and getting the legs and therefore the hamstrings to strengthen which can (eventually) lead to more length (if I muscle feels like it can protect itself it is more likely to stretch. Strange but true).

Third, most of us can always use work on our core strengthening. By supporting the spine in the way it needs to be supported you are more likely to start to relieve some of the low back pain so many of us complain about in daily life. And often, if you have tight hamstrings, they can pull on the low back and create some of that pain. By supporting the spine well, that may take the pressure off and start the process of finding a little more length in the hamstrings (remember that point about muscles needing to feel protected above).

Finally, we can all benefit from getting a little more mindful in our practice. When we bring focus to one posture it can often open up new curiosity and then more mindfulness and possibilities in other postures.

I hope that helps you feel more engaged in your practice of Ardha Uttanasana! If you have questions or comments, feel free to leave them in the comments below or ask before or after your next class.

Namasté!

If You Enjoyed This Post You May Also Like…