Snow storm restorative yoga!

FullSizeRender-6.jpg

Can you believe how Mother Nature is playing with us this year?? First it was Spring in February and now today we're having a blizzard! Go figure! Since we've had to cancel classes at the studio tonight due to the weather I thought I'd post a quick and easy restorative posture you can do at home after all the shoveling to help relieve those tired muscles! This is also great for people who spend a lot of time at the computer, or hunched over their work in whatever they do, because it opens up the front of the chest and takes the body in the opposite direction. Best of all, no fancy yoga props required!

All you need is a good sized blanket or towel like this:

FullSizeRender-10-1.jpg

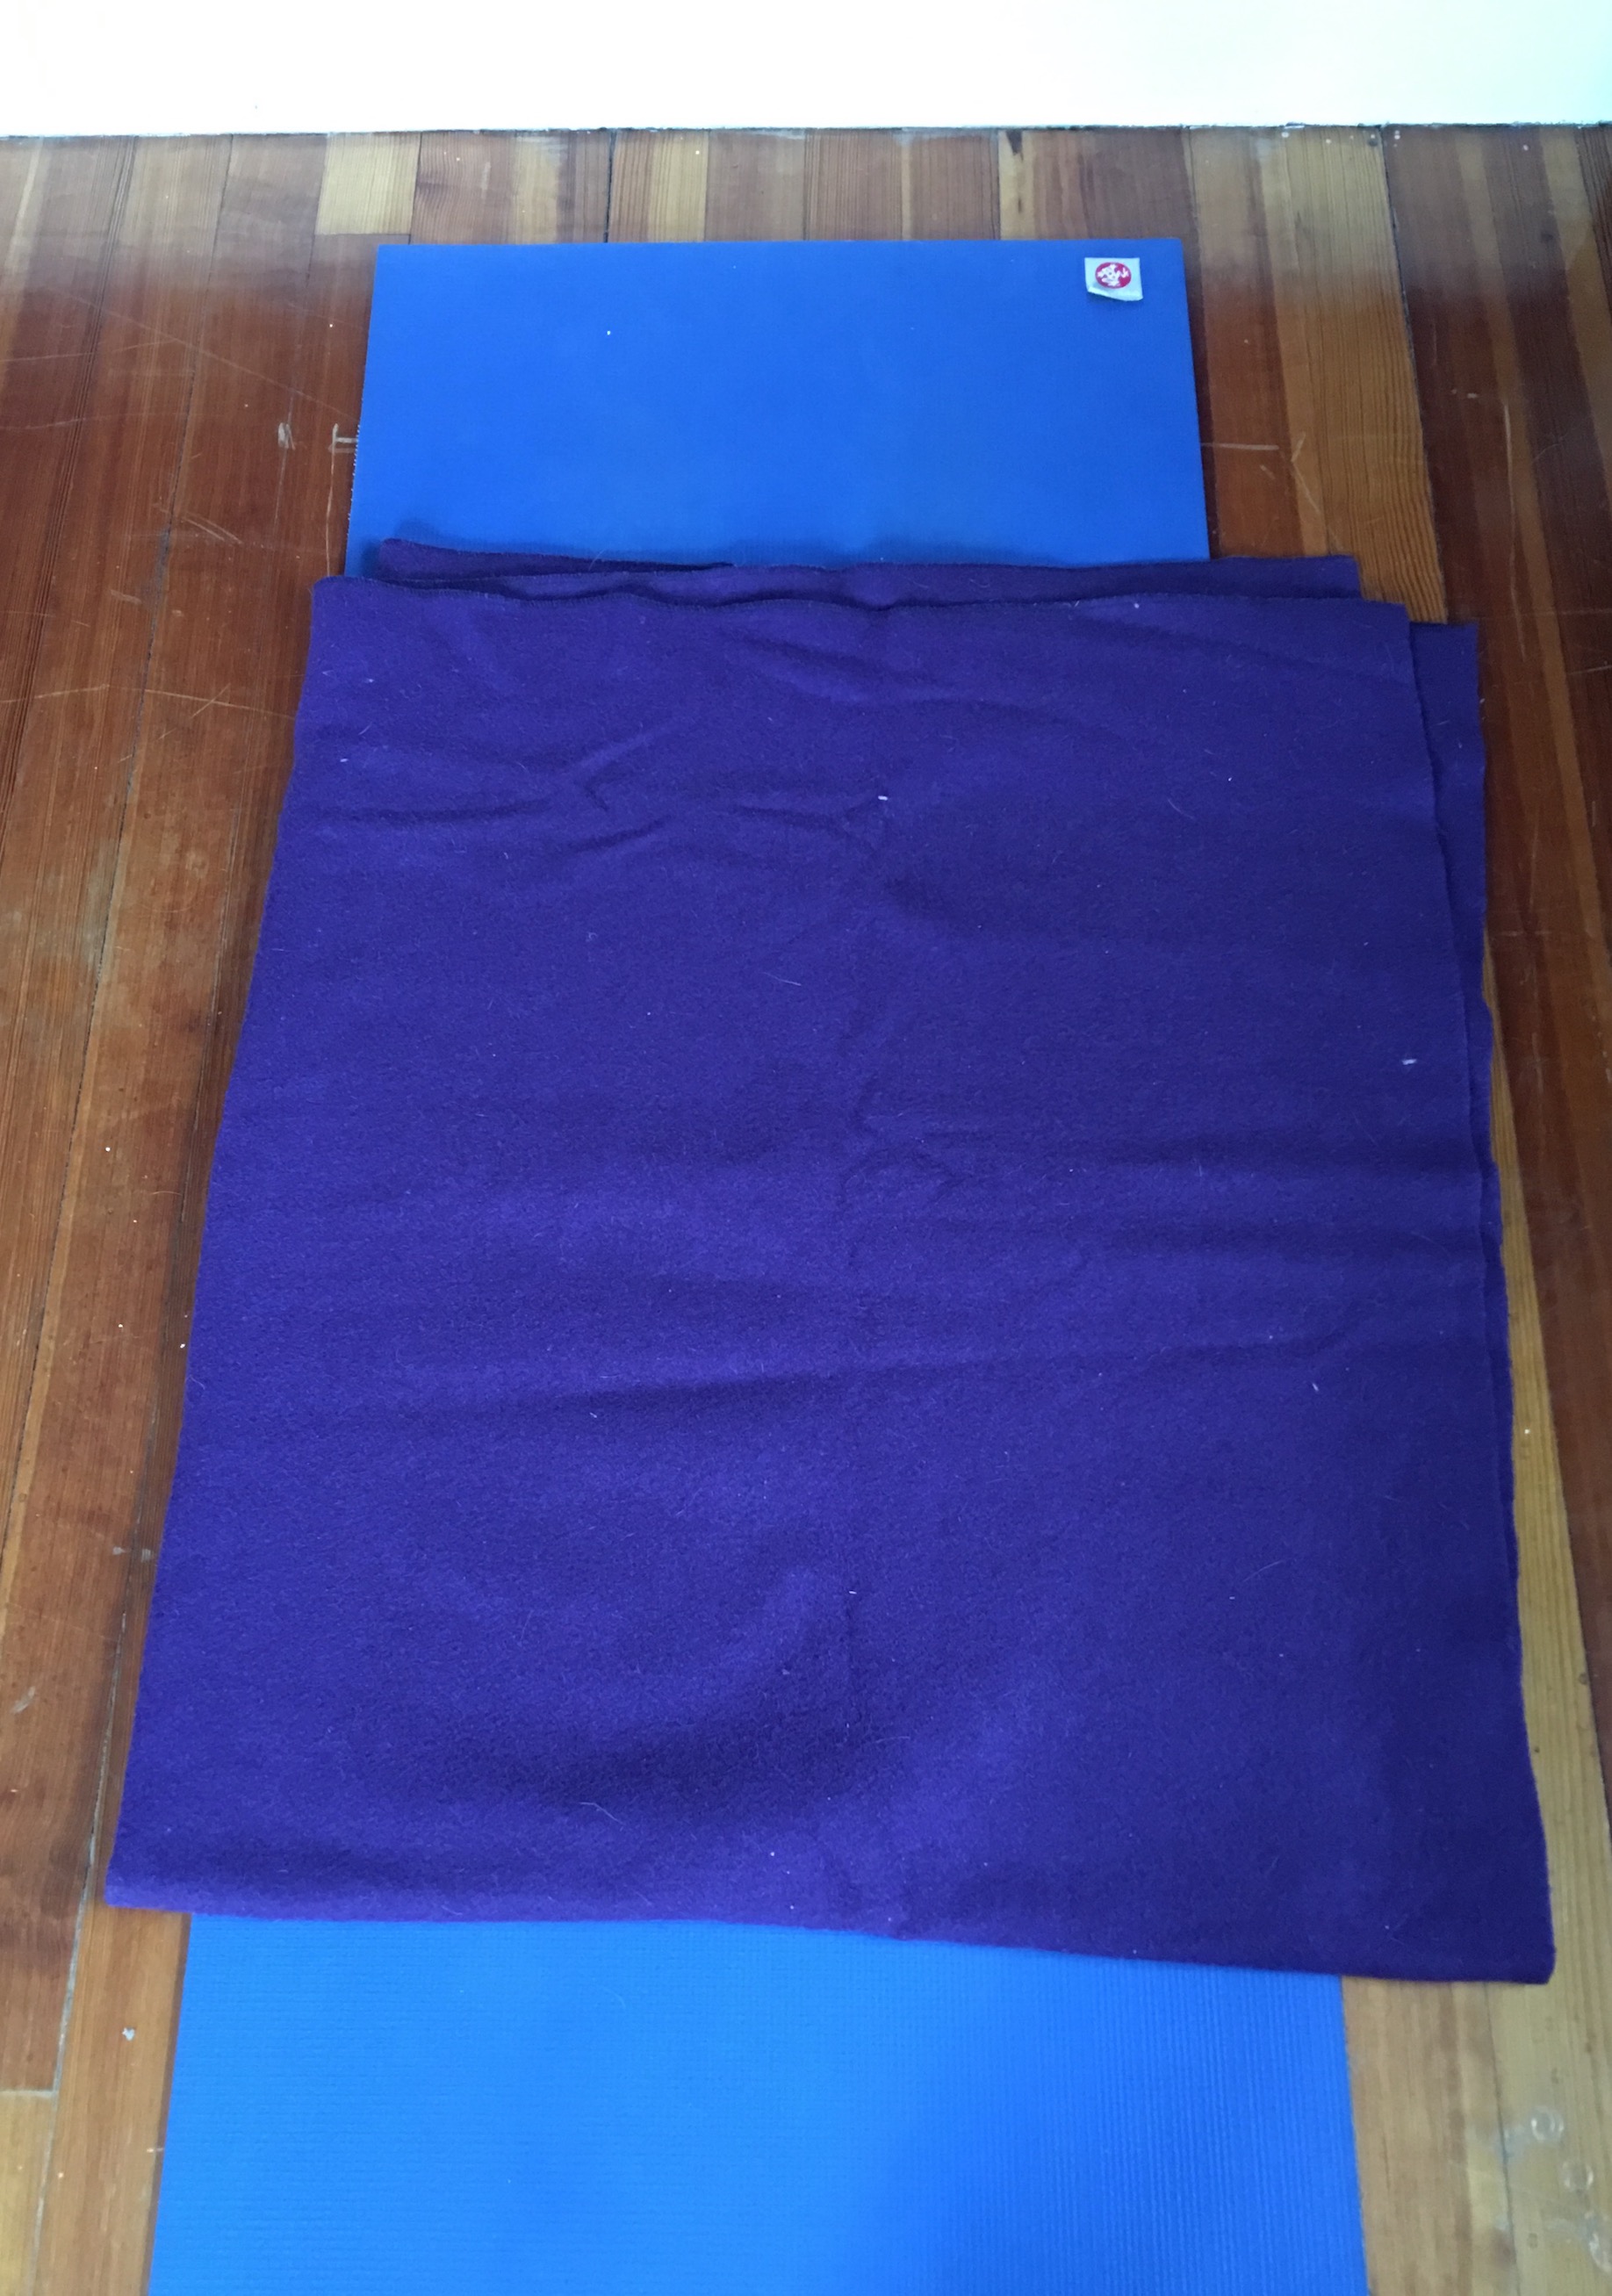
You could also use an extra rolled up yoga mat if that's what you have. You'll want to roll it into a circle like this:

IMG_8805.jpg

The size of your blanket/mat will determine the depth of the opening you'll experience. Remember that you can always unroll it a bit to make it more comfortable for YOUR body.

You can use this roll in two ways. One option is in line with the spine, the other is perpendicular to the spine behind the heart.

Let's do in line with the spine first. Lay your rolled blanket or towel on your mat in line with the long edges of your mat.

FullSizeRender-5-1.jpg

You'll then sit in front of that roll with your knees bent and with the blanket up against your low back and gently lower yourself back onto the roll. You may need to make some adjustments depending on the size of your blanket because you want to be sure that your head is ON the blanket, not falling off the end. Come back up and scooch down a bit if you need to. It should end up looking something like this:

FullSizeRender-6.jpg

Once you're there, check in with your low back. If it's tender you might keep your feet on the floor with your knees bent and wait a few breaths to see if it eases up. If not, get back up and unroll your blanket or towel a bit and try again. Once you find a happy place for your body, you might extend the legs or leave them bent. Your choice.

The other option is perpendicular to the spine. So lay your rolled blanket out like this:

FullSizeRender-9.jpg

And then come to lie back on it so it's behind your heart but below your armpits. It should look like this:

FullSizeRender-7.jpg

Again, keep your knees bent and see how your body feels. Get up and unroll the blanket a bit if it's too much for you. I also put another smaller rolled up blanket behind my neck in this picture but you don't have to. You'll probably experience this one as a much bigger stretch for the area across the front of the chest so be gentle with yourself! You've been shoveling after all!

You can stay in either of these postures for a few breaths or a few minutes. That's the joy of home practice; it's up to you! When you're ready to come out, bend your knees, roll to one side and then come up to seated. You might take some seated cat/cow stretches to move things around a bit afterward.

Let me know in the comments if you found this helpful!

Stay warm and dry everyone and hopefully we'll see you back at the studio tomorrow!

NamastΓ©,

Jessica

Two worlds come together

cowl.jpg

I love #yoga. I love #knitting. Sometimes the two loves meet in the middle. When I saw this pattern I had to make it! And, well... Be a little silly too. πŸ˜‰ When it's finished blocking I'll post more pics of it if anyone is interested. The whole thing says #omshanti in #Sanskrit. You'll see me wearing it at the studio soon unless the temperature stays warm. #knittingismyyoga #knittingismyselfcare #yogaismyyoga #yogaismyselfcare #trexhateschaturanga via

Instagram

Ardha Uttanasana or What’s the deal with half way lift?

Ardha Uttanasana.png

It’s a posture we seem to do a lot in vinyasa yoga classes but breeze right by without a second thought. So what’s the deal with Ardha Uttanasana?

First, let’s break down the Sanskrit. You may be very familiar with Uttanasana 

FullSizeRender-3.jpg

Often teachers don’t use the Sanskrit name of this pose. Ardha means half and uttansana is forward fold. So we get half forward fold.

Which is probably why you’ve heard this cued as β€œlift halfway” or β€œhalfway lift” from forward fold. That’s all well and good if you’re, as my husband calls me, bendy. But what if you aren’t so bendy? What if your Uttanasana looks like this:

FullSizeRender-4.jpg

Well, first of all, you’re just fine where you are! Don’t try to force yourself into a deeper forward fold. We always want to honor our bodies as they are and know that change is always possible. There are things we can do to make your forward fold better, but that isn’t what this post is about. So, getting back to our focus pose, if someone tells you to β€œlift halfway” and you’re already about half way between the possibility of folding and standing, what’s a yogi to do?

Consider what Ardha Uttansana is asking us to do. As far as shape goes, we’re basically making an upside down L with our bodies. That means that we want to lengthen our spine and strengthen our legs and our core support. So go back to that first picture of the posture.

FullSizeRender-1.jpg

Some things to notice.

As always, we want to build the posture from the ground up, so feet are sit bones distance apart and pressing into the earth with arches engaged. Moving up from there, and this is the first important point, knees are not locked. Often when we lift the spine up into this pose we tend to throw the knee joints back and inadvertently lock them out. That doesn’t help us build core strength because it stops that flow of energy from the earth we’ve cultivated by lifting the arches. Instead of the muscles doing their work, we throw all the effort of pose into the joints. Total bummer and not what joints were meant to do. So if we keep the knees slightly bent we have more opportunity to strengthen.

Next consider, where does that lift of the spine actually come from? Certainly, the muscles that run along the back part of the body are going to have to work here. That just makes sense. But wouldn’t it be nice if they didn’t have to do everything to fight gravity and achieve β€œlift off” on their own? Especially if you already have tight hamstrings or tend to experience low back pain? Of course! So that’s why we want to engage the core, as well as the belly/abs. I often think of this movement like a rising wave. When I’m lifting my spine up into the pose I actually think of lifting my belly first and then let that energy travel up the whole length of my spine. It’s like the spine unfurls in a wave that rolls out through the crown of my head. With that inner body support, my low back is fine and my spine can grow long.

Here’s where we have to show control though. Consider the difference between the picture above and this one:

FullSizeRender-2.jpg

Does this look like my neck is happy? Notsomuch. So we contain that wave of energy we’ve brought up from the earth through the legs and into the spine just enough that it draws the head into line with the rest of the spine. With all of that inner body activation the back body (which is a group of much smaller muscles) doesn’t have to work as hard. But let’s go back to that back body for one more moment to check in on one very important spot. The shoulders.

FullSizeRender-1.jpg

We’ve been working with engaging and strengthening the shoulders a lot in my classes lately. Here is no exception. Instead of slumping

FullSizeRender-4.jpg

The shoulders draw up and on to the back. That stabilization helps those small back body muscles get the memo that they do have to do some work too. It also allows the heart to open a bit more which helps with one most excellent thing: getting a deeper breath! If you think about it you are most likely asked to inhale when coming into this posture. The shoulders engaged allow us the space to get that nice deep breath we need for whatever might be coming up next. Yay!

So going back a bit, if you’re that person that can’t really touch your toes, what can you do in this pose and how can it benefit you?

First, you can think about that spinal length we’re looking to achieve here. With that lengthening of the spine you are finding the space for a fuller, deeper breath. With that deeper breath IN is the possibility for a fuller breath OUT which may encourage your back body to release a little more into that full forward fold on the next repetition.

Second, When you’re in this posture you can think more about pressing into the feet and getting the legs and therefore the hamstrings to strengthen which can (eventually) lead to more length (if I muscle feels like it can protect itself it is more likely to stretch. Strange but true).

Third, most of us can always use work on our core strengthening. By supporting the spine in the way it needs to be supported you are more likely to start to relieve some of the low back pain so many of us complain about in daily life. And often, if you have tight hamstrings, they can pull on the low back and create some of that pain. By supporting the spine well, that may take the pressure off and start the process of finding a little more length in the hamstrings (remember that point about muscles needing to feel protected above).

Finally, we can all benefit from getting a little more mindful in our practice. When we bring focus to one posture it can often open up new curiosity and then more mindfulness and possibilities in other postures.

I hope that helps you feel more engaged in your practice of Ardha Uttanasana! If you have questions or comments, feel free to leave them in the comments below or ask before or after your next class.

NamastΓ©!

If You Enjoyed This Post You May Also Like…

Yoga is for EVERYBODY!

wellness-day.jpg

Spending the afternoon talking to people about yoga at #amherstnh middle school. I've heard multiple stories today from people about how their first #yogaclass was traumatic because they were in a class that went way too fast, that the teacher didn't help them or that poses were called that were completely unsuitable for a beginner (bird of paradise anyone?!?). That makes me so sad!! Yoga can be accessible to EVERYONE, we just have to make it possible as teachers. That's something we really strive to do at Forever Yoga. If you had a bad experience in your first class please give yoga another try at our studio or someplace else. This practice has so much to offer its worth another shot. I promise! #yogaforbeginners #yogalove #yogaforlife #yogaforeveryone via

Instagram

Comment
Disclaimer: Not all yoga poses are suitable for all persons. Please consult with your health care provider and obtain full medical clearance before practicing yoga or any other exercise program. The information provided in this blog is strictly for reference only and is not in any manner a substitute for medical advice or direct guidance of a qualified yoga instructor.

Partner Yoga with my partner

partner-pigeon.jpg

Me and my husband in #pigeonpose during our #partneryoga class at #foreveryoganh on Saturday! The last time we did partner yoga the year was 2010, I was in my #200hourteachertraining in #NJ @naturally_yoga, it was his second #yoga class ever and we were engaged. My how time flies! Photo and awesome class courtesy of @tracichick57 ! Thanks Traci for a fun and challenging class! #yogaclass #ekapadarajakapotasana #couplesyoga #yogalove #yogaclass #bluehairedgirl #bluehairedgirls via

Instagram

Meditation coach

meditation-coach.jpg

My #meditation coach this morning. 😻 #animals love the #healing #vibrations of meditation just as much as we do. So don't be surprised if your fuzzy family members want to join in on your practice. 😊 #catsofinstagram #kirtan via

Instagram