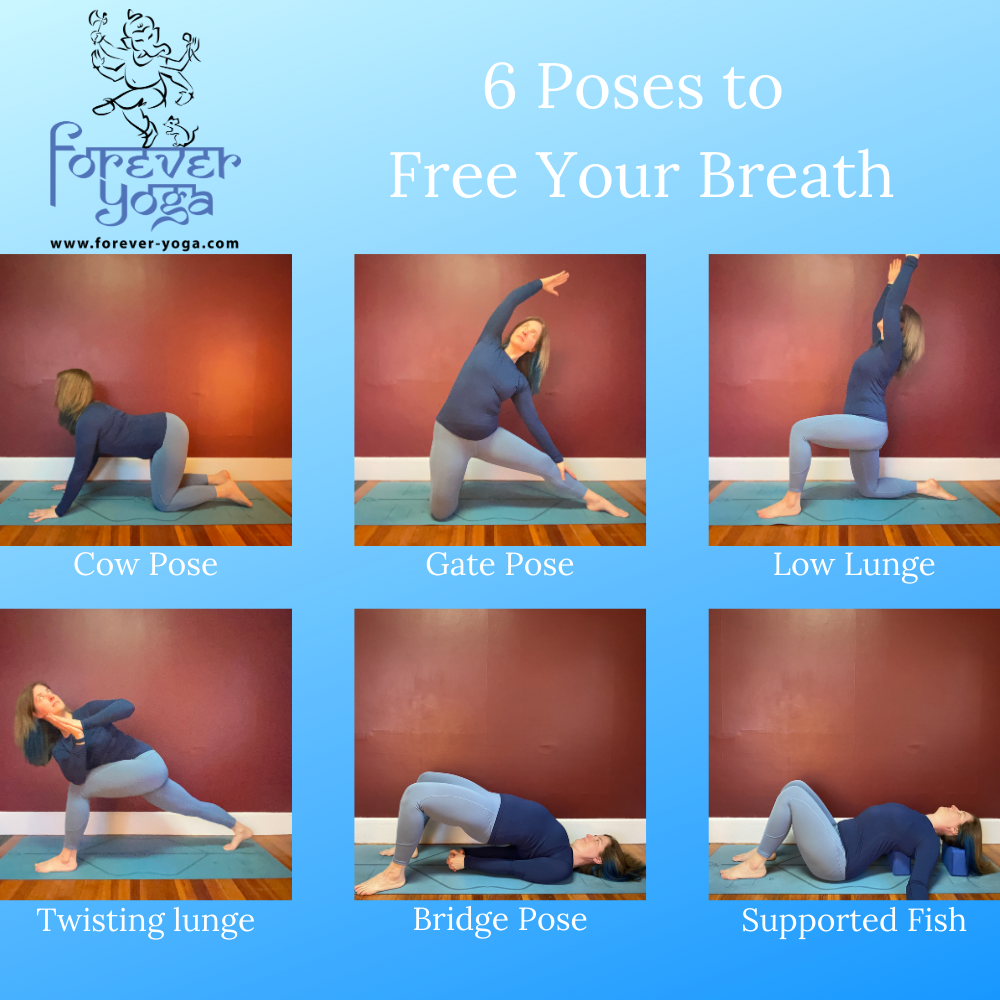
6 Poses to Free Your Breath
/
“The Breath Is Life Itself.”
I heard Sharon Salzberg say this recently in an online retreat. That’s certainly the view that the teachings of yoga present to us for consideration. The breath fuels everything from the fire of our digestion to the urge to eliminate to the length of our time here on earth according to the sacred texts. The circumstances of the last several months may have our breath feeling less than free and open for a variety of reasons including fear, stress, and sitting at computers more and more. If you find yourself unable to take a deep breath lately because your holding so much tension around your lungs and ribs, consider working with this simple sequence to bring some balance and freedom to the area.
As you approach this sequence you might look at it in one of two ways: 1) A series of postures you can hold for a couple to several breaths each or 2) some points to emphasize in the context of a flow. Either way is perfectly valid and will allow you to find some benefit. You might experiment with both ways depending on your energy level and the time you have to work through the sequence. Let’s look at each pose in turn and I’ll give you some options.
Cow pose - We don’t often see this posture without it’s complement, cat pose, but it certainly has merits on its own in the context of this sequence. As you move into it bring some emphasis to the feeling of broadness it may create through the front of the chest. I’ve heard some teachers talk about “pulling the chest through the shoulder blades” as you inhale into it and that certainly draws a good mental picture. Hold this one for one to several breaths or make it more dynamic by adding cat pose on each exhalation.
Gate pose - This posture creates a deep opening through the side body that may be felt not only through the rib cage but perhaps even up into the arm pit or down into the belly, hip and the standing leg. This is an area where many of us have considerable constriction. This can inhibit the breathing because the ribs aren’t as able to lift and separate from each other to create the space for deep breaths to enter the body. In our daily lives most of us don’t lift our arms into this position more than once a day on purpose! You might consider some padding under the standing knee for this one if your knees are at all tender. Be sure to do both sides!
At this point you may want to bring in some half sun salutations or some lunging salutations to warm the body and bring in some demand to the breath intensity, or as I mentioned above, you might just move into the next posture.
Low lunge - Bring careful attention to the alignment of this posture as I have it pictured here. Many practitioners come into the posture with the hips forward and down a great deal more with the front knee often coming past the ankle. In this version, I am purposely drawing a line from my hips straight down to the lower knee. The torso stacks on top of that and there may even be a little backbend here. Also important is the top of the back foot pressing down firmly into the mat. The overall effect of these details is a great deal more length on the front side of the body, especially through the hip flexors which are often tight and short. What does that have to do with the breath? I can almost guarantee that as you’re reading this, you’re sitting in a chair and perhaps a bit hunched forward. 😉 Try to take a deep breath in that position. Yeah, it doesn’t work so well. Now, sit up tall (even better, stand up and do this) and you may notice a subtle but tangible difference. Front body space allows for deeper breaths. It also prepares us for a real backbend. But first…
Twisting lunge - There is a whole network of long, rope-like muscles that run up and down the length of our spines. It’s a place where many of us hold tension we don’t even notice and many of these muscles tend to be under a great deal of stress because they’re over stretched. Twisting can relieve this tension in these muscles while also bringing length to some of those side body muscles that wrap the ribs and abdomen that we touched into earlier in this sequence. With this one you can always simplify by dropping the back knee to the floor. Also consider allowing the pelvis to turn into the twist and work together with the spine.
Bridge pose - There are so many benefits to this pose, but for our purposes here let’s focus on how this frees the breath. With the hands interlaced behind the back as pictured, there’s a great opportunity to broaden through the front of the chest. As the hips lift, nearly the whole front side of the body is opening as well. Additionally, with the hips above the heart we have a slightly inverted relationship with gravity. This gives us a chance to exercise the breathing diaphragm, an essential muscle of respiration that moves down toward the feet when we inhale and up towards the head when we exhale. In this position, instead of working WITH gravity as it normally would when we’re upright, it’s working AGAINST gravity (just a little bit) and you may actually find yourself having to work a little harder to take an inhale. It may be quite subtle, but this is good exercise for a muscle we don’t often consider strengthening in most forms of physical movement.
Supported Fish - Our last posture is one that when well adjusted can be quite restful and allow us to take advantage of the space we’ve created in the body for our breathing throughout this sequence. You can use two yoga blocks, one behind your skull (that’s important!) and one behind your heart. Depending on your experience with this posture and your flexibility, you might want the one behind your heart on the lowest level and the one behind your skull on the highest level or some other combination. You can also do this by rolling or folding up a blanket and laying back over it with it landing behind your heart, just below your armpits. Whichever option you choose, allow your arms to come out to the side and turn the palms up for more space through the front of the chest. Once you’ve settled in and gotten comfortable, this is a great place to linger and focus on your breathing. I like to imagine my breath coming in through the nostrils and down to the base of my spine and then filling my torso right up to my collar bones with breath and then allowing all the breath to release in reverse. Stay for a few breaths or several minutes and enjoy all that freedom you created!
You’ll find many of these postures in my vinyasa classes this month. If you can’t join me for the Livestream consider signing up for my new On Demand Video Membership through Patreon.
If You Enjoyed This Post You May Also Like…


